Application plugin
Overview
Rainbond's plugin system abstraction focuses on the business level, with its theoretical foundation rooted in Kubernetes' Pod mechanism and some container concepts.The process abstracts Kubernetes container orchestration at the platform business level, transforming it into a Rainbond plugin product that is user-friendly, enabling users to utilize it without understanding Kubernetes principles.
Rainbond's plugin types mainly include the following two:
- Init container: A container that runs when the pod is created, mainly used to initialize application data, environment, etc. The init container starts before the main container, primarily for initializing application data, environment, etc.
- General container: A container that starts simultaneously with the main container, mainly used to extend application functionality, such as log collection, monitoring, etc.
Design principles
The design of the Rainbond plugin system follows the principles of easy to understand and easy to use:
- Easy to understand: In the Rainbond plugin system, the process of using a plugin is the process of combining the main container with init or sidecar containers. The principle is to orchestrate the plugin container into the main application's pod in the form of a sidecar container (mostly), sharing the main application container's network and environment variables.
- Easy to use: The principle of easy use in the Rainbond plugin system is reflected in application-like, binding use, unique variable scope, etc.
Application-like
The Rainbond plugin system designs a lifecycle for plugins similar to applications, including creation, activation, deactivation, etc., consistent with the habits of Rainbond platform users in operating applications.At the same time, the Rainbond plugin system simplifies the types of plugin creation, supporting creation based on docker image and dockerfile, making plugin creation simpler than application creation.
The plugin creation process design is as shown in the following figure:
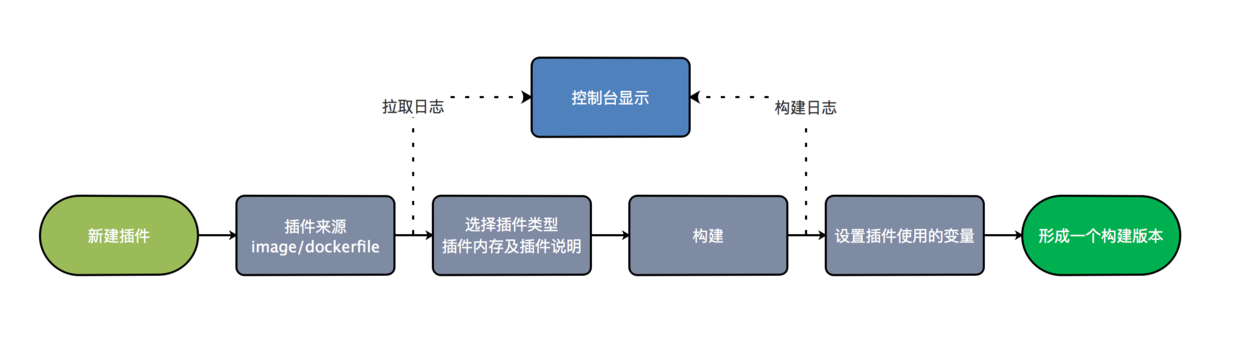
It should be noted that once a plugin version is fixed, its memory, version information, and plugin variables cannot be modified again. These elements only affect the current plugin version.When modifying plugin variables and other elements, perform a rebuild on the plugin and repeat the creation process.
After creation, users can make targeted settings for the plugin. Currently, variables, whether the plugin is effective, and memory settings can be set.Memory limits will be imposed when the Pod is created. The effectiveness and real-time modification of plugin variables will be further introduced below.
Unique variable scope
Variables injected into the container are designed to be of two types: shared variables and plugin variables.
- Shared variables are the variables of the main container. To allow the plugin to participate in or even extend the functionality of the main application, the main application's environment variables are injected into the plugin container during the Pod creation process.
- Plugin variables only act within the plugin container, preventing variable duplication and misuse between plugins.
Plugin usage
Install plugins from the application market
Rainbond provides a rich plugin market where users can select suitable plugins to install into their applications.
Go to Team -> Plugins, click Install from the application market, select the needed plugin, and click install.
Create a new plugin
- Go to Team -> Plugins, click to create a new plugin:
- Plugin name: The name of the plugin, used to distinguish different plugins.
- Installation source: Rainbond provides two installation sources: image and Dockerfile.When using an image, provide the image address.When using a Dockerfile file, provide the project source code address.
- Plugin type: Plugin types include
init typeandgeneral type. - Resource limits: The resource limits of the plugin, including CPU and memory.
- Start command: The start command of the plugin.
- Description: The description information of the plugin.
- Enter the created plugin and build the plugin.
- Add plugin configuration as follows:
- Configuration group name: The name of the configuration group, used to distinguish different configuration groups.
- Configuration items: Configure the environment variables of the plugin, supporting string, single selection, and multiple selection types.
Enable plugin
After installing or creating a new plugin, you need to enable the plugin in the component.
On the component details page, click Plugins, select the needed plugin, and click Enable.
Performance analysis plugin
- Go to Team -> Plugins, select to install plugins from the application market, search for the performance analysis plugin, and click install.
- Go to the component details page, click Plugins, select the performance analysis plugin, and click Enable.
- Go to the monitoring page, select the performance analysis plugin, and view the performance analysis details.
Indicator explanation:
- Response time: Response time is also known as latency. Components generally work at the application layer of network communication, such as http, mysql, redis, grpc, etc.The time taken for a component to process a client request each time is the response time.If we measure from the dimension of network packets, it is the time from the arrival of the first packet of the request message to the sending of the first packet of the response message.
- Throughput rate: Throughput rate is also known as traffic, which is the number of requests processed by the component per unit time.
- Error rate: Errors include explicit errors (such as HTTP 500 errors) and implicit errors (such as HTTP returning 200 but the business is wrong). Here we mainly focus on explicit errors. Each communication protocol has standard error types, such as mysql having query statement errors.Under normal circumstances, the error rate is closely related to the saturation of the component.